From Client Curation to Final Approval
Wedding albums should be one of the most rewarding parts of your photography business.
You’ve already photographed the wedding. You’ve edited the images. You’ve delivered a beautiful gallery. And now you have the opportunity to turn the story of the day into something your clients can hold, display, and pass down.
But for many photographers, the album process is where momentum disappears.
The design is finished, the first proof is sent, and then everything slows down. Clients take weeks to respond. Feedback comes in scattered emails. Revision notes are hard to interpret. You make updates, send another proof, and wait again. This is the post-wedding bottleneck.
The good news is that album delays usually are not caused by bad clients or bad design. They are usually caused by a workflow that asks clients to make too many decisions, in too many places, with too little structure. A seamless wedding album workflow fixes that.
When the process is clear:
- Clients respond faster.
- Revisions are easier to manage.
- Albums get approved sooner.
- And photographers spend less time chasing feedback and more time moving finished work to print.
Here’s how to build a wedding album workflow that takes your clients from image curation to final approval without the usual back-and-forth.
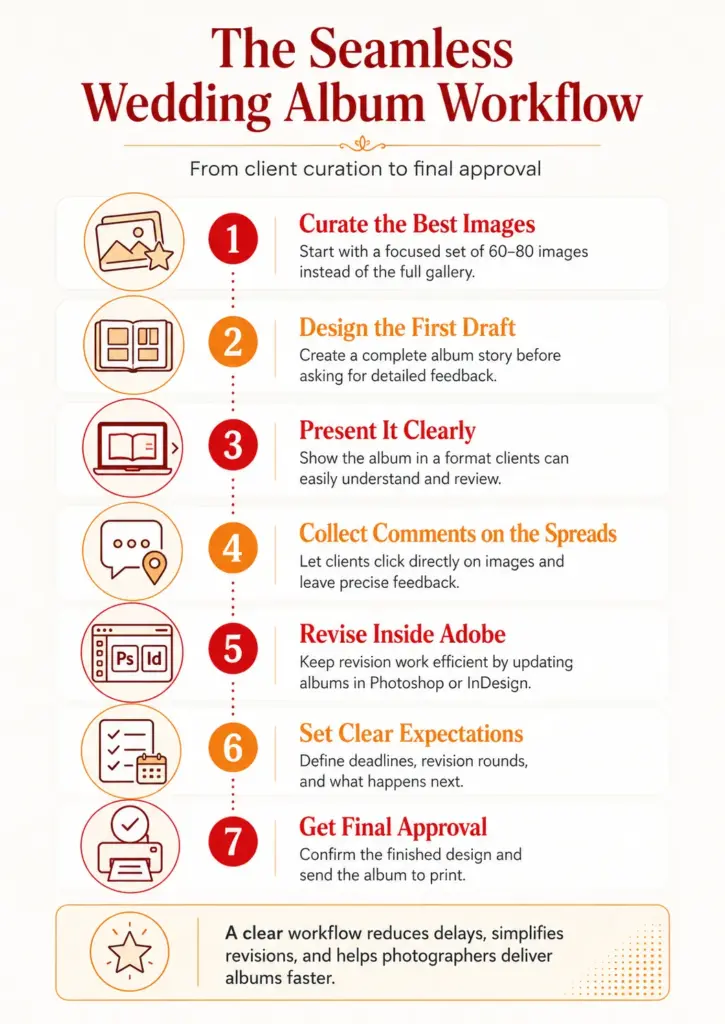
Step 1: Simplify Image Curation for Your Clients
One of the biggest mistakes photographers make is giving clients too many choices too early.
After a wedding, it can be tempting to deliver the full gallery and let the couple decide what belongs in the album. On the surface, that feels generous. In reality, it often creates decision fatigue.
A client looking through 700 or 800 images is not thinking like an album designer. They are remembering the day, reacting emotionally, and trying not to leave anything important out. That can quickly turn into an oversized album, scattered image requests, or months of delayed decisions.
A better workflow starts with professional curation.
Instead of asking the couple to build the album from scratch, begin by selecting the strongest 60 to 80 images that tell the story clearly. Focus on the flow of the day:
- Getting ready
- Details
- First look or pre-ceremony portraits
- Ceremony
- Family portraits
- Couple portraits
- Reception details
- Toasts, dancing, and key candid moments
This does two important things.
- First, it reduces the emotional burden on the client. They are not starting from a blank page.
- Second, it reinforces your role as the storyteller. Your clients hired you because you know how to see the day. The album should reflect that expertise.
You can still allow clients to request swaps later. But the first version should feel complete, intentional, and easy to react to. The goal is not to include everything. The goal is to create a first draft that feels like the wedding.
Step 2: Design the Album Before Asking for Detailed Feedback
A common workflow problem happens when photographers ask clients to choose album images before showing them the design.
That sounds logical, but it often makes the process harder.
Most clients do not know how an image will work in an album until they see it in context. A photo that feels important in the gallery may not carry the same weight in the layout. Another image they overlooked may become powerful when paired with the right spread.
That is why the first proof should be a designed album, not just a collection of selected photos.
When clients see the story laid out as spreads, they can respond to the experience of the album instead of judging each image individually. They can see pacing, emotion, variety, and balance.
This also keeps the process moving. You are not waiting for clients to make every design decision before you begin. You are giving them something concrete to approve, refine, or adjust.
A strong first design should answer these questions:
- Does the album tell the full story of the day?
- Does each spread have a clear purpose?
- Are emotional moments given enough space?
- Are portraits and details balanced with candid storytelling?
- Does the ending feel satisfying?
Once the design is ready, the next step is how you present it.
Step 3: Present the Album in a Way Clients Understand
Many photographers still send album proofs as PDFs. PDFs are familiar and easy to export, but they are not always the best way for clients to experience an album.
A flat PDF can make spreads feel disconnected from the final product. Clients may scroll too quickly, zoom awkwardly, or leave comments that are difficult to connect to specific images. They are reviewing a file, not experiencing a book.
Wedding clients do not think in terms of “spread 7” or “image frame 3.” They respond to how the album feels. That is why presentation matters.
A better album proofing workflow lets clients view the album in a way that resembles the finished book. Flip-book style previews can help clients understand the flow from page to page. A single-page or blog-style view can also be useful for clients who prefer to scroll through all spreads quickly.
The key is to remove friction.
Clients should be able to open the album, understand what they are looking at, and know exactly how to leave feedback. They should not need special instructions, extra software, or a long explanation from you.
This is where a dedicated online album proofing system can make a major difference. With Banti Album Proofing, photographers can present albums as flip-book previews or as a full spread-by-spread view, giving clients a more natural way to review the design.
The easier the album is to review, the faster clients can respond.
Step 4: Stop Using Email for Album Design Feedback
The biggest breakdown in most album workflows happens during revisions.
You send the proof. The client replies with something like:
“On spread 4, can you swap the top left photo with the one where we’re laughing? Also on spread 9, maybe use the black and white version. And can we remove the picture near the bottom of the page where my eyes look weird?”
You know what happens next.
You open the album. You open the gallery. You try to figure out which image they mean. You reply with a clarifying question. They respond three days later. Then another family member joins the email thread with more opinions.
This is how a simple album revision becomes a project management problem.
The issue is not that clients are being difficult. The issue is that email is a poor tool for visual feedback.
Album feedback needs to be connected directly to the design.
Instead of asking clients to describe what they mean, give them a way to click on the exact image or spread and leave a comment there. That one change can remove a huge amount of confusion.
For example, instead of writing:
“Can you change the photo on the left side of the ceremony page?”
The client can click the exact image and write:
“Please replace this with the photo of us walking back down the aisle.”
That is clear. That is actionable. That does not require five follow-up emails.
Tired of chasing clients for album feedback? Start a free trial with Banti and let your clients pin comments directly to your spreads.
A dedicated proofing workflow also helps keep all comments in one place. You are not searching through email threads, text messages, PDFs, and handwritten notes. The feedback stays attached to the album where it belongs. That makes revisions faster for you and easier for your clients.
Step 5: Keep Revisions Inside Your Design Workflow
Once client feedback is collected, the next challenge is implementing it efficiently.
This is another place where photographers lose time.
If your comments live in one browser tab, your album design lives in another application, and your image files are somewhere else, every revision requires constant switching. You read the comment, move to Photoshop or InDesign, find the spread, make the change, go back to the browser, mark the item complete, and repeat.
That may not sound like much for one comment. But across multiple albums and multiple revision rounds, it adds up quickly.
A professional workflow should keep you as close as possible to the creative work.
If you design albums in Photoshop or InDesign, your revision process should support that environment instead of pulling you away from it. This is one of the reasons Banti’s Adobe extension is useful for album designers. It allows photographers to review and respond to client comments directly from Photoshop and InDesign, reducing the need to bounce back and forth between the proofing tool and the design file.
That matters because revision work is not just administrative. You are still making design decisions.
You are checking balance, spacing, image quality, page flow, and emotional impact. The less time you spend managing comments, the more attention you can give to the actual album.
A good revision workflow should let you:
- See exactly where each client comment belongs
- Make changes in your design software
- Track what has been completed
- Respond clearly to client requests
- Prepare the next proof without rebuilding the process from scratch
The smoother this step becomes, the easier it is to keep albums moving.
Step 6: Set Clear Approval Expectations
Even with the right tools, clients still need structure. Do not send an album proof with a vague message like:
“Let me know what you think.”
That sounds friendly, but it leaves the process open-ended. Clients may not know what kind of feedback you want, how long they have to respond, or how many revision rounds are included.
Instead, set expectations every time you send a proof. Your message should explain:
- What the client is reviewing
- How they should leave comments
- What kind of changes are appropriate at this stage
- When feedback is due
- What happens after approval
For example:
“Your first album proof is ready. Please review the full design and leave any requested changes directly on the album spreads. At this stage, focus on photo swaps, missing moments, or small layout concerns. Once your comments are submitted, I’ll make the revisions and send one updated proof for final approval.”
That kind of instruction does not feel pushy. It feels professional.
It also protects your time.
Clients are more likely to respond when the next step is obvious. They are also less likely to restart the design process if you have clearly defined what revision rounds are for.
Step 7: Make Final Approval Feel Easy
Final approval should feel like a natural ending, not another confusing step.
By the time clients see the final proof, they should already understand the process. They reviewed the design. They left comments. You made revisions. Now they are confirming that the album is ready for print. Make this step simple and specific.
Instead of asking, “Does everything look good?” ask them to approve the album for production.
That language matters. It signals that the design phase is complete and the project is moving into the final stage.
Your final approval message can be short:
“Your revised album proof is ready. Please review the updates and approve the album for print when everything looks correct. Once approved, I’ll send the final files to production.”
A clean approval process helps prevent last-minute uncertainty. It gives the client confidence and gives you a clear record that the album is complete.
A Seamless Workflow Helps You Sell More Albums
A better album workflow does more than save time after the sale. It can also help you sell more albums in the first place.
When photographers avoid albums, it is often because the process feels heavy. They remember the delays, the revision confusion, and the unfinished projects sitting in their inbox. Over time, albums start to feel like a burden instead of a profitable product.
But when the workflow is simple, albums become easier to recommend.
You can confidently tell clients that the process is guided, visual, and easy. You can show them how the proofing process works. You can explain that they will not have to sort through hundreds of images or manage confusing email threads.
That confidence matters.
Clients are more likely to invest in an album when they believe the process will be enjoyable.
A seamless workflow also improves the client experience after the wedding. Instead of ending with a stalled project, you end with a finished heirloom. That creates a stronger final impression and increases the chance of referrals.
The Complete Wedding Album Workflow
Here is the workflow in its simplest form:
- Curate the strongest images before involving the client.
- Design the first album proof as a complete story.
- Present the album in a visual, easy-to-review format.
- Collect comments directly on the spreads.
- Make revisions efficiently in Photoshop or InDesign.
- Set clear deadlines and revision expectations.
- Get final approval and move the album to print.
None of these steps are complicated on their own. The power comes from connecting them into one smooth process.
When every step has a purpose, the album moves forward.
Final Thoughts
Wedding albums do not need to get stuck in revision limbo.
Most delays happen because the workflow is too loose. Clients are given too many choices, feedback is collected in the wrong place, and revisions are managed through tools that were not built for album proofing.
A better process gives clients clarity and gives photographers control.
Start with curation. Present the album beautifully. Keep comments connected to the design. Make revisions without leaving your creative workflow. Then guide the client toward final approval.
That is how you turn album proofing from a bottleneck into a polished part of your client experience.
If you want to simplify your own album workflow, try Banti Album Proofing. You can present albums online, let clients leave comments directly on spreads, manage approvals more easily, and review feedback from Photoshop or InDesign.
Start your free trial with Banti Album Proofing and build a smoother path from first proof to final approval.
And if you are ready to improve your design workflow too, explore Banti’s free InDesign Album Templates so you can start with a stronger foundation for your next wedding album.